

概述
深度学习是一个广阔的领域,但我们大多数人在构建模型时都面临一些共同的难题 在这里,我们将讨论提高深度学习模型性能的4个难题和技巧 这是一篇以代码实践为重点的文章,所以请准备好你的Python IDE并改进你的深度学习模型!
介绍
过去两年的大部分时间,我几乎都在深度学习领域工作。这是一个相当好的经历,这中间我参与了图像和视频数据相关的多个项目。
在那之前,我处于边缘地带,我回避了对象检测和人脸识别等深度学习概念。直到2017年底才开始深入研究。在这段时间里,我遇到了各种各样的难题。我想谈谈四个最常见的问题,大多数深度学习实践者和爱好者在他们的旅程中都会遇到。

目录
深度学习模型的共同难题 车辆分类案例研究概述 了解每个难题以及如何克服难题以提高深度学习模型的性能 案例研究:改善我们的车辆分类模型的性能
深度学习模型的共同难题
深度学习模型通常在大多数数据上的表现都非常好。在图像数据方面,深度学习模型,尤其是卷积神经网络(CNN),几乎胜过所有其他模型。
我通常的方法是在遇到图像相关项目(例如图像分类项目)时使用CNN模型。
这种方法效果很好,但是在某些情况下,CNN或其他深度学习模型无法执行。我遇到过几次。我的数据很好,模型的体系结构也正确定义,损失函数和优化器也正确设置,但是我的模型没有达到我的预期。
这是我们大多数人在使用深度学习模型时面临的常见难题。
如上所述,我将解决四个此类难题:
缺乏可用于训练的数据 过拟合 欠拟合 训练时间长
在深入探讨和理解这些难题之前,让我们快速看一下我们将在本文中解决的案例研究。
车辆分类案例研究概述
本文是我一直在写的PyTorch面向初学者系列的一部分。你可以在此处查看前三篇文章(我们将从那里引用一些内容):
- PyTorch入门指南
- 在PyTorch中使用卷积神经网络建立图像分类模型
- 使用PyTorc进行迁移学习
我们将继续阅读上一篇文章中看到的案例研究。这里的目的是将车辆图像分类为紧急或非紧急。
首先,让我们快速构建一个CNN模型,并将其用作基准。我们还将尝试改善此模型的性能。这些步骤非常简单,在之前的文章中我们已经看过几次。
因此,我不会在这里深入每一步。相反,我们将重点放在代码上,你始终可以在我上面链接的先前文章中更详细地进行检查。
你可以从此处获取数据集:https://drive.google.com/file/d/1EbVifjP0FQkyB1axb7KQ26yPtWmneApJ/view
这是为我们的车辆分类项目构建CNN模型的完整代码。
导入库
# 导入库

import pandas as pd

import numpy as np

from tqdm import tqdm

# 用于读取和显示图像

from skimage.io import imread

from skimage.transform import resize

import matplotlib.pyplot as plt

%matplotlib inline

# 用于创建验证集

from sklearn.model_selection import train_test_split

# 用于评估模型

from sklearn.metrics import accuracy_score

# PyTorch库和模块

import torch

from torch.autograd import Variable

from torch.nn import Linear, ReLU, CrossEntropyLoss, Sequential, Conv2d, MaxPool2d, Module, Softmax, BatchNorm2d, Dropout

from torch.optim import Adam, SGD

# 预训练模型

from torchvision import models
加载数据集
# 加载数据集

train = pd.read_csv('emergency_train.csv')

# 加载训练图片

train_img = []

for img_name in tqdm(train['image_names']):

    # 定义图像路径

    image_path = '../Hack Session/images/' + img_name

    # 读取图片

    img = imread(image_path)

    # 标准化像素值

    img = img/255

    img = resize(img, output_shape=(224,224,3), mode='constant', anti_aliasing=True)

    # 转换为浮点数

    img = img.astype('float32')

    # 添加图片到列表

    train_img.append(img)

# 转换为numpy数组

train_x = np.array(train_img)

train_x.shape

创建训练和验证集
# 定义目标

train_y = train['emergency_or_not'].values

# 创建验证集

train_x, val_x, train_y, val_y = train_test_split(train_x, train_y, test_size = 0.1, random_state = 13, stratify=train_y)

(train_x.shape, train_y.shape), (val_x.shape, val_y.shape)

将图像转换为torch格式
# 转换训练图片到torch格式

train_x = train_x.reshape(1481, 3, 224, 224)

train_x  = torch.from_numpy(train_x)

# 转换目标到torch格式

train_y = train_y.astype(int)

train_y = torch.from_numpy(train_y)

# 转换验证图像到torch格式

val_x = val_x.reshape(165, 3, 224, 224)

val_x  = torch.from_numpy(val_x)

#  转换目标到torch格式

val_y = val_y.astype(int)

val_y = torch.from_numpy(val_y)
定义模型架构
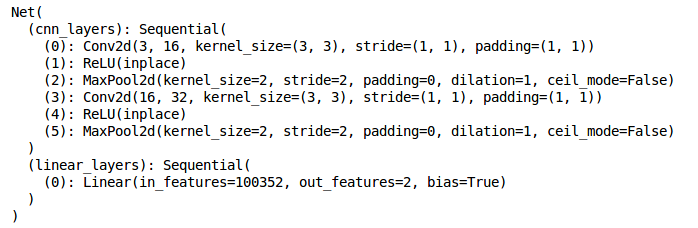
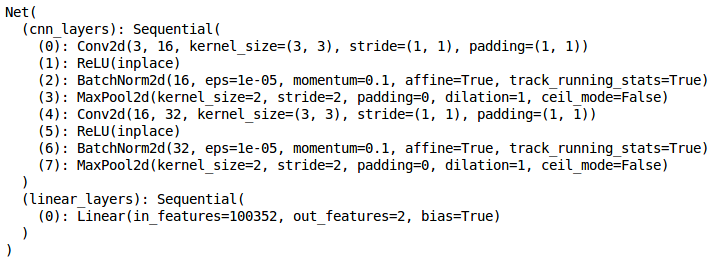
torch.manual_seed(0)

class Net(Module):

    def __init__(self):

        super(Net, self).__init__()

        self.cnn_layers = Sequential(

            # 定义2D卷积层

            Conv2d(3, 16, kernel_size=3, stride=1, padding=1),

            ReLU(inplace=True),

            MaxPool2d(kernel_size=2, stride=2),

            # 另一个2D卷积层

            Conv2d(16, 32, kernel_size=3, stride=1, padding=1),

            ReLU(inplace=True),

            MaxPool2d(kernel_size=2, stride=2)

        )

        self.linear_layers = Sequential(

            Linear(32 * 56 * 56, 2)

        )

    # 前项传播

    def forward(self, x):

        x = self.cnn_layers(x)

        x = x.view(x.size(0), -1)

        x = self.linear_layers(x)

        return x
定义模型参数
# 定义模型

model = Net()

# 定义优化器

optimizer = Adam(model.parameters(), lr=0.0001)

# 定义损失函数

criterion = CrossEntropyLoss()

# 检查GPU是否可用

if torch.cuda.is_available():

    model = model.cuda()

    criterion = criterion.cuda()

print(model)
训练模型
torch.manual_seed(0)
# 模型batch大小
batch_size = 128
# epoch数
n_epochs = 25
for epoch in range(1, n_epochs+1):
# 保持记录训练与验证集损失
train_loss = 0.0
permutation = torch.randperm(train_x.size()[0])
training_loss = []
for i in tqdm(range(0,train_x.size()[0], batch_size)):
indices = permutation[i:i+batch_size]
batch_x, batch_y = train_x[indices], train_y[indices]
if torch.cuda.is_available():
batch_x, batch_y = batch_x.cuda(), batch_y.cuda()
optimizer.zero_grad()
outputs = model(batch_x)
loss = criterion(outputs,batch_y)
training_loss.append(loss.item())
loss.backward()
optimizer.step()
training_loss = np.average(training_loss)
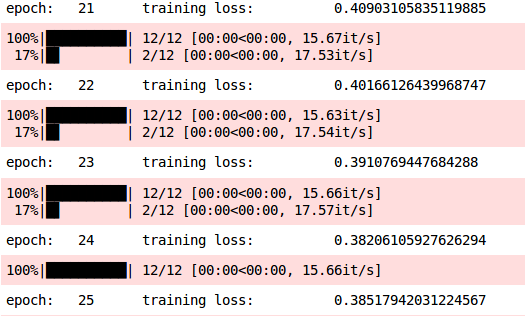
print('epoch: \t', epoch, '\t training loss: \t', training_loss)
训练集上预测
# 训练集预测

prediction = []

target = []

permutation = torch.randperm(train_x.size()[0])

for i in tqdm(range(0,train_x.size()[0], batch_size)):

    indices = permutation[i:i+batch_size]

    batch_x, batch_y = train_x[indices], train_y[indices]

    if torch.cuda.is_available():

        batch_x, batch_y = batch_x.cuda(), batch_y.cuda()

    with torch.no_grad():

        output = model(batch_x.cuda())

    softmax = torch.exp(output).cpu()

    prob = list(softmax.numpy())

    predictions = np.argmax(prob, axis=1)

    prediction.append(predictions)

    target.append(batch_y)

# 训练集精度

accuracy = []

for i in range(len(prediction)):

    accuracy.append(accuracy_score(target[i],prediction[i]))

print('training accuracy: \t', np.average(accuracy))

验证集上预测
# 验证集预测

prediction_val = []

target_val = []

permutation = torch.randperm(val_x.size()[0])

for i in tqdm(range(0,val_x.size()[0], batch_size)):

    indices = permutation[i:i+batch_size]

    batch_x, batch_y = val_x[indices], val_y[indices]

    if torch.cuda.is_available():

        batch_x, batch_y = batch_x.cuda(), batch_y.cuda()

    with torch.no_grad():

        output = model(batch_x.cuda())

    softmax = torch.exp(output).cpu()

    prob = list(softmax.numpy())

    predictions = np.argmax(prob, axis=1)

    prediction_val.append(predictions)

    target_val.append(batch_y)

# 验证集精度

accuracy_val = []

for i in range(len(prediction_val)):

    accuracy_val.append(accuracy_score(target_val[i],prediction_val[i]))

print('validation accuracy: \t', np.average(accuracy_val))

深度学习的难题
深度学习的难题1:缺乏可用的数据来训练我们的模型
数据增强是在不实际收集新数据的情况下,生成新数据或增加数据以训练模型的过程。
深度学习难题#2:模型过拟合
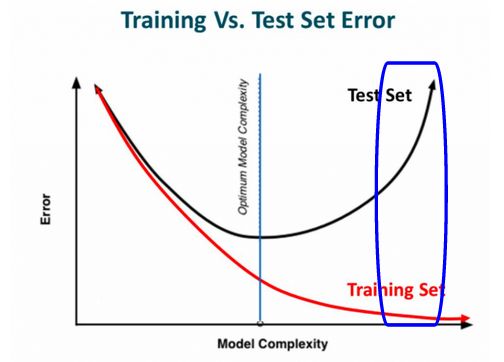
当一个模型在训练集上执行得非常好,但是在验证集(或不可见的数据)上性能下降时,就会被认为是过拟合。
模型架构
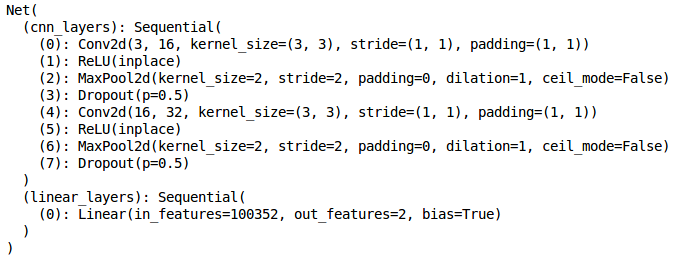
torch.manual_seed(0)

class Net(Module):

    def __init__(self):

        super(Net, self).__init__()

        self.cnn_layers = Sequential(

            # 定义2D卷积层

            Conv2d(3, 16, kernel_size=3, stride=1, padding=1),

            ReLU(inplace=True),

            MaxPool2d(kernel_size=2, stride=2),

            # Dropout层

            Dropout(),

            #另一个2D卷积层

            Conv2d(16, 32, kernel_size=3, stride=1, padding=1),

            ReLU(inplace=True),

            MaxPool2d(kernel_size=2, stride=2),

            # Dropout层

            Dropout(),

        )

        self.linear_layers = Sequential(

            Linear(32 * 56 * 56, 2)

        )

    # 前向传播

    def forward(self, x):

        x = self.cnn_layers(x)

        x = x.view(x.size(0), -1)

        x = self.linear_layers(x)

        return x
模型参数
# 定义模型

model = Net()

# 定义优化器

optimizer = Adam(model.parameters(), lr=0.0001)

# 定义损失函数

criterion = CrossEntropyLoss()

# 检查GPU是否可用

if torch.cuda.is_available():

    model = model.cuda()

    criterion = criterion.cuda()

print(model)
训练模型
torch.manual_seed(0)

# 模型batch大小

batch_size = 128

# epoch数

n_epochs = 25

for epoch in range(1, n_epochs+1):

    # 保持记录训练与验证集损失

    train_loss = 0.0

    permutation = torch.randperm(train_x.size()[0])

    training_loss = []

    for i in tqdm(range(0,train_x.size()[0], batch_size)):

        indices = permutation[i:i+batch_size]

        batch_x, batch_y = train_x[indices], train_y[indices]

        if torch.cuda.is_available():

            batch_x, batch_y = batch_x.cuda(), batch_y.cuda()

        optimizer.zero_grad()

        outputs = model(batch_x)

        loss = criterion(outputs,batch_y)

        training_loss.append(loss.item())

        loss.backward()

        optimizer.step()

    training_loss = np.average(training_loss)

    print('epoch: \t', epoch, '\t training loss: \t', training_loss)
检查模型性能
#

prediction = []

target = []

permutation = torch.randperm(train_x.size()[0])

for i in tqdm(range(0,train_x.size()[0], batch_size)):

    indices = permutation[i:i+batch_size]

    batch_x, batch_y = train_x[indices], train_y[indices]

    if torch.cuda.is_available():

        batch_x, batch_y = batch_x.cuda(), batch_y.cuda()

    with torch.no_grad():

        output = model(batch_x.cuda())

    softmax = torch.exp(output).cpu()

    prob = list(softmax.numpy())

    predictions = np.argmax(prob, axis=1)

    prediction.append(predictions)

    target.append(batch_y)

# 训练集精度

accuracy = []

for i in range(len(prediction)):

    accuracy.append(accuracy_score(target[i],prediction[i]))

print('training accuracy: \t', np.average(accuracy))

同样,让我们检查验证集准确性:
# 验证集预测

prediction_val = []

target_val = []

permutation = torch.randperm(val_x.size()[0])

for i in tqdm(range(0,val_x.size()[0], batch_size)):

    indices = permutation[i:i+batch_size]

    batch_x, batch_y = val_x[indices], val_y[indices]

    if torch.cuda.is_available():

        batch_x, batch_y = batch_x.cuda(), batch_y.cuda()

    with torch.no_grad():

        output = model(batch_x.cuda())

    softmax = torch.exp(output).cpu()

    prob = list(softmax.numpy())

    predictions = np.argmax(prob, axis=1)

    prediction_val.append(predictions)

    target_val.append(batch_y)

# 验证集精度

accuracy_val = []

for i in range(len(prediction_val)):

    accuracy_val.append(accuracy_score(target_val[i],prediction_val[i]))

print('validation accuracy: \t', np.average(accuracy_val))

让我们将其与以前的结果进行比较:
| 训练集准确性 | 验证集准确性 | |
|---|---|---|
| 没有Dropout | 87.80 | 69.72 |
| 有Dropout | 73.56 | 70.29 |
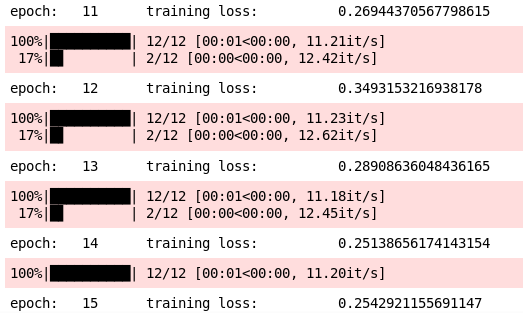
深度学习难题3:模型欠拟合
欠拟合是指模型无法从训练数据本身中学习模式,因此训练集上的性能较低。
增加训练数据 制作一个复杂的模型 增加训练的epoch
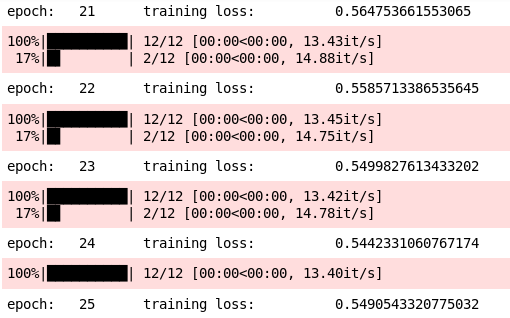
深度学习难题4:训练时间过长
为了克服这一问题,我们可以应用批处理标准化(batch normalization),其中我们正常化的激活隐藏层,并试图作出相同的分布。
torch.manual_seed(0)

class Net(Module):

    def __init__(self):

        super(Net, self).__init__()

        self.cnn_layers = Sequential(

            # 定义2D卷积层

            Conv2d(3, 16, kernel_size=3, stride=1, padding=1),

            ReLU(inplace=True),

            # BN层

            BatchNorm2d(16),

            MaxPool2d(kernel_size=2, stride=2),

            #另一个2D卷积层

            Conv2d(16, 32, kernel_size=3, stride=1, padding=1),

            ReLU(inplace=True),

            # BN层

            BatchNorm2d(32),

            MaxPool2d(kernel_size=2, stride=2),

        )

        self.linear_layers = Sequential(

            Linear(32 * 56 * 56, 2)

        )

    # 前向传播

    def forward(self, x):

        x = self.cnn_layers(x)

        x = x.view(x.size(0), -1)

        x = self.linear_layers(x)

        return x
定义模型参数
# 定义模型

model = Net()

# 定义优化器

optimizer = Adam(model.parameters(), lr=0.00005)

# 定义损失函数

criterion = CrossEntropyLoss()

# 检查GPU是否可用

if torch.cuda.is_available():

    model = model.cuda()

    criterion = criterion.cuda()

print(model)
让我们训练模型
torch.manual_seed(0)

# 模型batch大小

batch_size = 128

# epoch数

n_epochs = 5

for epoch in range(1, n_epochs+1):

    # 保持记录训练与验证集损失

    train_loss = 0.0

    permutation = torch.randperm(train_x.size()[0])

    training_loss = []

    for i in tqdm(range(0,train_x.size()[0], batch_size)):

        indices = permutation[i:i+batch_size]

        batch_x, batch_y = train_x[indices], train_y[indices]

        if torch.cuda.is_available():

            batch_x, batch_y = batch_x.cuda(), batch_y.cuda()

        optimizer.zero_grad()

        outputs = model(batch_x)

        loss = criterion(outputs,batch_y)

        training_loss.append(loss.item())

        loss.backward()

        optimizer.step()

    training_loss = np.average(training_loss)

    print('epoch: \t', epoch, '\t training loss: \t', training_loss)

prediction = []

target = []

permutation = torch.randperm(train_x.size()[0])

for i in tqdm(range(0,train_x.size()[0], batch_size)):

    indices = permutation[i:i+batch_size]

    batch_x, batch_y = train_x[indices], train_y[indices]

    if torch.cuda.is_available():

        batch_x, batch_y = batch_x.cuda(), batch_y.cuda()

    with torch.no_grad():

        output = model(batch_x.cuda())

    softmax = torch.exp(output).cpu()

    prob = list(softmax.numpy())

    predictions = np.argmax(prob, axis=1)

    prediction.append(predictions)

    target.append(batch_y)

# 训练集精度

accuracy = []

for i in range(len(prediction)):

    accuracy.append(accuracy_score(target[i],prediction[i]))

print('training accuracy: \t', np.average(accuracy))

# 验证集预测

prediction_val = []

target_val = []

permutation = torch.randperm(val_x.size()[0])

for i in tqdm(range(0,val_x.size()[0], batch_size)):

    indices = permutation[i:i+batch_size]

    batch_x, batch_y = val_x[indices], val_y[indices]

    if torch.cuda.is_available():

        batch_x, batch_y = batch_x.cuda(), batch_y.cuda()

    with torch.no_grad():

        output = model(batch_x.cuda())

    softmax = torch.exp(output).cpu()

    prob = list(softmax.numpy())

    predictions = np.argmax(prob, axis=1)

    prediction_val.append(predictions)

    target_val.append(batch_y)

# 验证集精度

accuracy_val = []

for i in range(len(prediction_val)):

    accuracy_val.append(accuracy_score(target_val[i],prediction_val[i]))

print('validation accuracy: \t', np.average(accuracy_val))

案例研究:提高车辆分类模型的性能
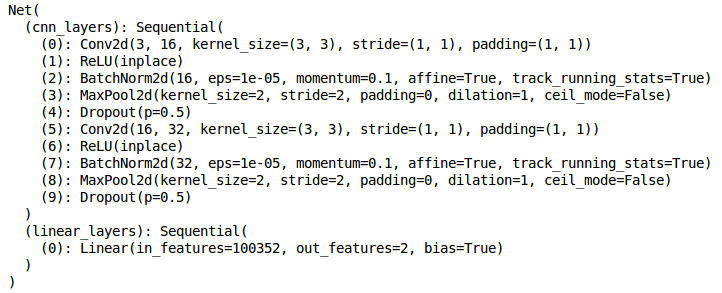
torch.manual_seed(0)

class Net(Module):

    def __init__(self):

        super(Net, self).__init__()

        self.cnn_layers = Sequential(

            # 定义2D卷积层

            Conv2d(3, 16, kernel_size=3, stride=1, padding=1),

            ReLU(inplace=True),

            # BN层

            BatchNorm2d(16),

            MaxPool2d(kernel_size=2, stride=2),

            # 添加dropout

            Dropout(),

            #另一个2D卷积层

            Conv2d(16, 32, kernel_size=3, stride=1, padding=1),

            ReLU(inplace=True),

            # BN层

            BatchNorm2d(32),

            MaxPool2d(kernel_size=2, stride=2),

            # 添加dropout

            Dropout(),

        )

        self.linear_layers = Sequential(

            Linear(32 * 56 * 56, 2)

        )

    # 前向传播

    def forward(self, x):

        x = self.cnn_layers(x)

        x = x.view(x.size(0), -1)

        x = self.linear_layers(x)

        return x
现在,我们将定义模型的参数:
# 定义模型

model = Net()

# 定义优化器

optimizer = Adam(model.parameters(), lr=0.00025)

# 定义损失函数

criterion = CrossEntropyLoss()

# 检查GPU是否可用

if torch.cuda.is_available():

    model = model.cuda()

    criterion = criterion.cuda()

print(model)
最后,让我们训练模型:
torch.manual_seed(0)

# 模型batch大小

batch_size = 128

# epoch数

n_epochs = 10

for epoch in range(1, n_epochs+1):

    # 保持记录训练与验证集损失

    train_loss = 0.0

    permutation = torch.randperm(train_x.size()[0])

    training_loss = []

    for i in tqdm(range(0,train_x.size()[0], batch_size)):

        indices = permutation[i:i+batch_size]

        batch_x, batch_y = train_x[indices], train_y[indices]

        if torch.cuda.is_available():

            batch_x, batch_y = batch_x.cuda(), batch_y.cuda()

        optimizer.zero_grad()

        outputs = model(batch_x)

        loss = criterion(outputs,batch_y)

        training_loss.append(loss.item())

        loss.backward()

        optimizer.step()

    training_loss = np.average(training_loss)

    print('epoch: \t', epoch, '\t training loss: \t', training_loss)
接下来,让我们检查模型的性能:
prediction = []

target = []

permutation = torch.randperm(train_x.size()[0])

for i in tqdm(range(0,train_x.size()[0], batch_size)):

    indices = permutation[i:i+batch_size]

    batch_x, batch_y = train_x[indices], train_y[indices]

    if torch.cuda.is_available():

        batch_x, batch_y = batch_x.cuda(), batch_y.cuda()

    with torch.no_grad():

        output = model(batch_x.cuda())

    softmax = torch.exp(output).cpu()

    prob = list(softmax.numpy())

    predictions = np.argmax(prob, axis=1)

    prediction.append(predictions)

    target.append(batch_y)

# 训练集精度

accuracy = []

for i in range(len(prediction)):

    accuracy.append(accuracy_score(target[i],prediction[i]))

print('training accuracy: \t', np.average(accuracy))

# 验证集预测

prediction_val = []

target_val = []

permutation = torch.randperm(val_x.size()[0])

for i in tqdm(range(0,val_x.size()[0], batch_size)):

    indices = permutation[i:i+batch_size]

    batch_x, batch_y = val_x[indices], val_y[indices]

    if torch.cuda.is_available():

        batch_x, batch_y = batch_x.cuda(), batch_y.cuda()

    with torch.no_grad():

        output = model(batch_x.cuda())

    softmax = torch.exp(output).cpu()

    prob = list(softmax.numpy())

    predictions = np.argmax(prob, axis=1)

    prediction_val.append(predictions)

    target_val.append(batch_y)

# 验证集精度

accuracy_val = []

for i in range(len(prediction_val)):

    accuracy_val.append(accuracy_score(target_val[i],prediction_val[i]))

print('validation accuracy: \t', np.average(accuracy_val))

验证准确性明显提高到73%。太棒了!
结尾
调整Dropout率 增加或减少卷积层的数量 增加或减少Dense层的数量 调整隐藏层中的神经元数量,等等。